Showing posts with label Raw edged fused. Show all posts

Jul 13, 2015

TOURNESOLS

TOURNESOLS
 19"X35"
An Original Design
Raw Edged Fused Applique
Machine Quilted

Making Sunflowers always is a joy for me.   I love all the movement you can create as well as the mood you can set.  These three a blowing in the wind but glorious in the sun.
It is available for sale in my Etsy shoppe here.


THE JOURNEY


Dec 8, 2014

BUILDING A TURKEY USING TISSUE DRAWING

 I have been asked why I sketch on tissue paper and how I use that when making my art quilts.  So here is my process for you to better understand why this works for me.   One reason I like tissue paper as I only have to draw the bird out once and do not need a light table to see it once you flip it over in order to draw it or parts of it onto your fusible.  So I have flipped my drawing and now trace the entire bird onto  a piece of fusible.

 Once cut out he is facing the right direction.
 It is important to keep you sketch in the opposite direction of the way the bird is facing so you do not trace and cut out parts for your bird that are not the reverse of what they will be when on the fusible only. 
 I have traced out the beak and the lighter part of the turkey's head on the fusible.


 Then I place those pieces on selected fabric and fuse them, cut them out,  and remove the fusible.

I place my tissue paper drawing on top of my silhouette of the bird and with a needle position those tiny pieces right were they need to be.  I carefully remove my tissue and fuse it down.  When doing animals or birds I also use my pin to poke a hole in the drawing so when this piece of tissue is on the head pieces I can take a prisma pen and push it through the tissue to mark exactly where I want the eye to be.
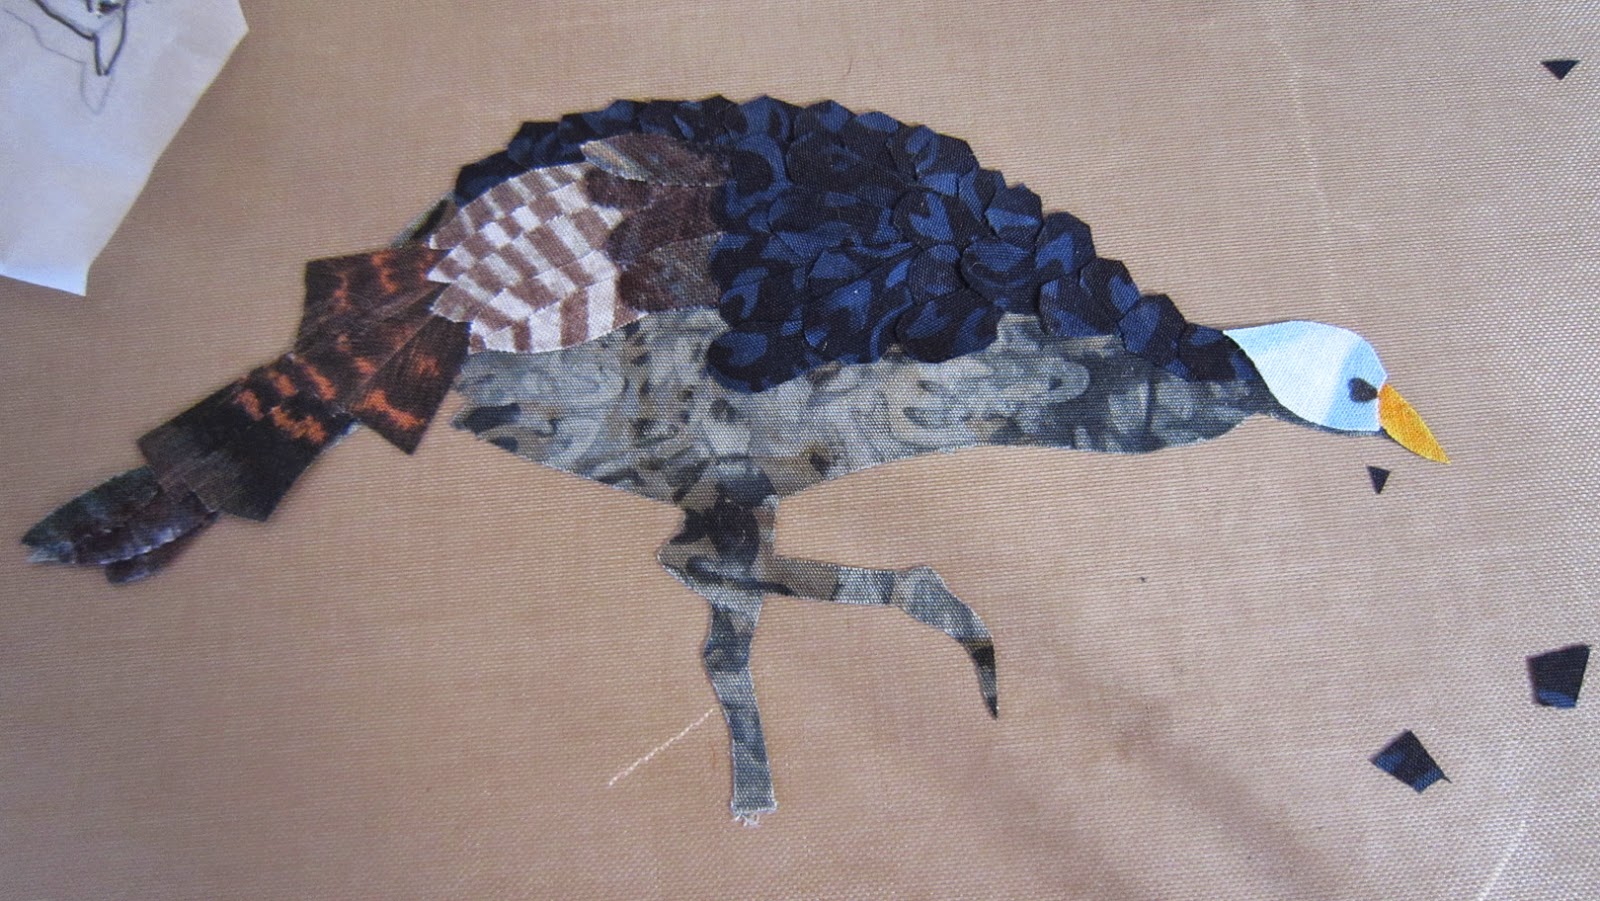
So here is the bird now....ready for feathers.
 
When doing feathers I like to cut them out of prefused fabric that I selected prior to beginning the quilt.  I do this pretty much free form.   You must remember to start at the bottom most feather and layer them on top of it...one at a time.
 You can cut them any way you like....sometimes angular like these other time I round out the bottoms.
 I usually cut a strip approximately the size I want the feathers and just cut back and forth until I have a pile ready to layer.

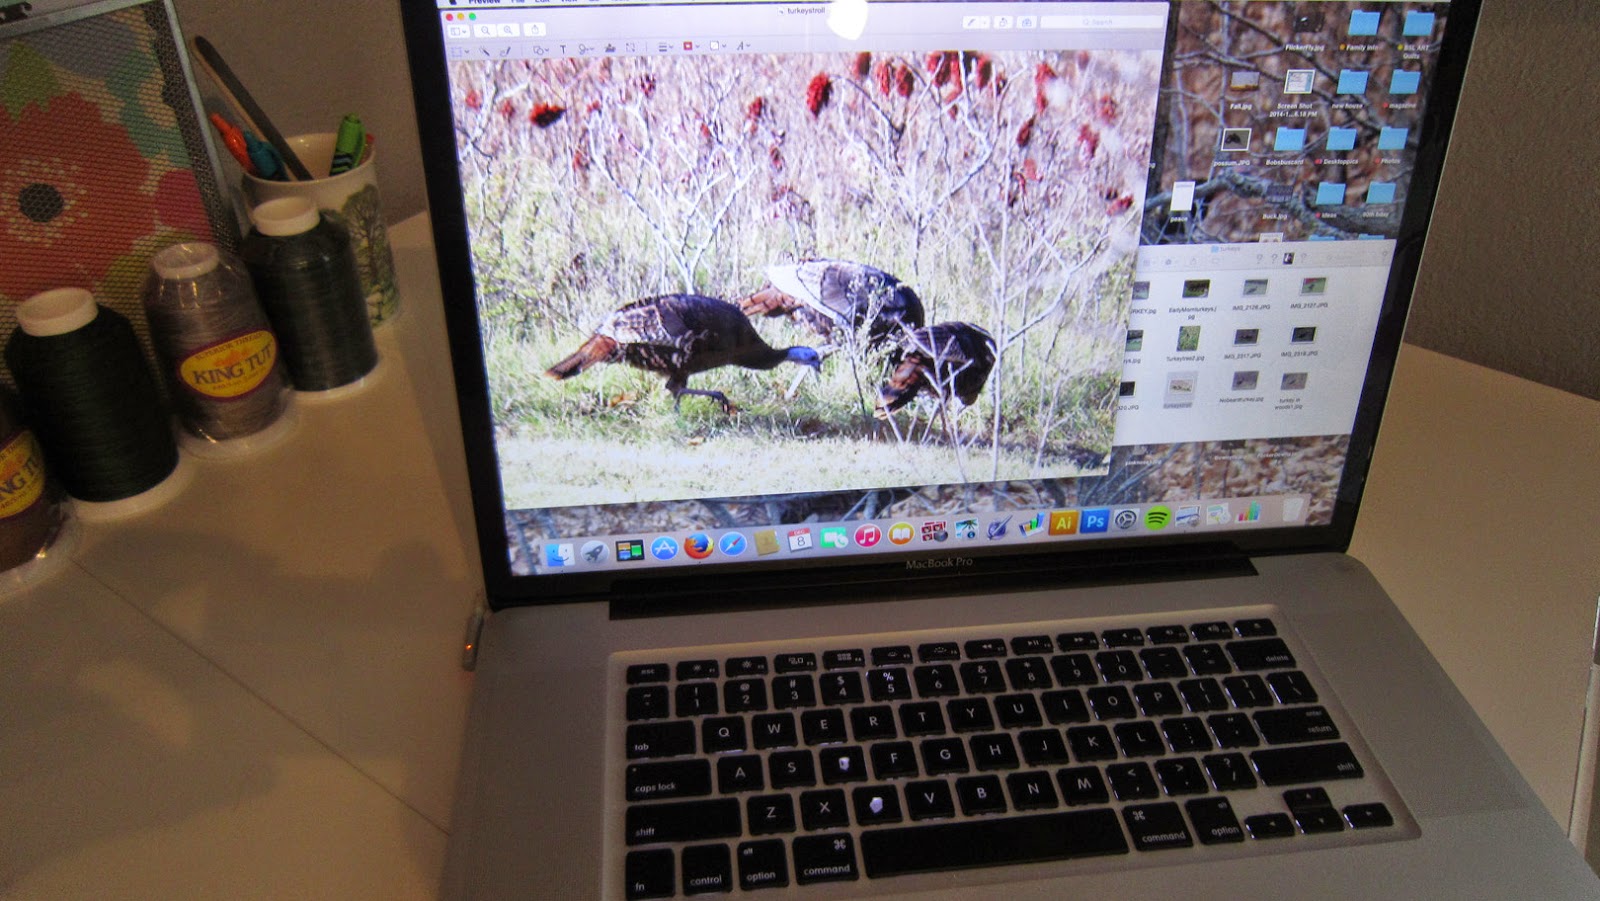
 Through this all I keep my photo that I took up on my desktop to refer to when not sure of the fabric choices.


 This is all I can do of these feathers because others must be done first.

 I lay my sketch on and begin at the bottom of the tail.

 I build up the tail from the bottom up.

 The tissue is layed on the bird to make sure each layer and different fabric choices are where they need to be.
 This is an example of a piece of fabric that many would not think would make a good choice for
feathers, but if you think "out of the box" so to speak, it is the perfect fabric for these turkey wings.
 Once again these feathers are cut free form and layered under the tissue just where I want them to be.

Looking good.....

 Now the brown feathers above the striped ones.....

 ....and then more of the irredescent black body feathers...

 I double check to be sure I have enough body feathers and to also add the legs.

 I think he is perfect.....

So I fuse him onto my background and he joins his buddies.  Now it is time to quilt him and make him pop!

I hope this has helped you all understand my technique just a little better.

Dec 5, 2014

TURKEY NO. 1


Viewers have asked me how long it takes me to make a quilt.   I can never answer that question as there are always so many variables but I do have a general idea.  So when making this turkey I decided to pay attention to the time factor.  He took me most of the afternoon...5 hours to construct and I was not happy with him.   So got up this morning and worked 2 more hours on him.  Then 4 hours quilting him...so a total of 11 hours.  Of course there were some breaks in there for answering the phone, fixing mistakes,  cleaning out the machine, changing threads over and over but over all....pretty accurate.  Yes...the next one will go much faster just because I will not need to do as many fabric selections, thread selections, or make the mistakes that I did on this one, but it give you an idea at least.   All in all....I am happy with No. 1.

May 9, 2014

BLUE JAY CONSTRUCTION


Here is how I constructed this bird.  I start with a sketch on tissue paper, so once all the major pieces are cut out of the fabric I have chosen,   I can line them up properly using the tissue paper sketch as a guide. All is done on top of my teflon sheet.

 He looks good now but will get better with his feathers quilted in.


Apr 3, 2014

Trees & Shrubs

I have been working on the small branches and twigs of the background trees.  Two more to go before adding in the birch tree.  Slow tedious work but worthwhile.

Mar 11, 2014

Bird & Branch

 Began the under body feathers today as will as the tail.   These are at the lowest part of the birds body and under all the other feathers so they go on first with the tail going on over them.
 Here you can see the mossy branch  as well as the section shown above and the tail all on the background.

Finally I recheck the layout with my sketch.  This is why I love to sketch on tracing paper because you can be sure your placement is right by laying the sketch on top of the pieces that are ready to be fused down.....They look good so they are fused and tomorrow I will quilt this section to the background.

Nov 15, 2013

Hummers

Finished the small Hummingbird….added the border….some leaves to add depth as well as interest.   Now will finish all the quilting and put on binding.  The size of this piece will be approximately 28" X 35".  

Jun 13, 2013

"Shoreline Reflections"

 "SHORELINE REFLECTIONS"
27" X 17 1/2"
Original Design
Rawedged Fused Applique
Machine Quilted


I have finished "Shoreline Reflections".  It was a serene journey making this quilt.  Taking me away from some of the chaos in my life right now.   I loved working on it.  Thinking of a secret place I like to go where these lily pads float.  A great place to meditate. 

Related Posts Plugin for WordPress, Blogger...